It's been a while since I published a full guest tutorial, so without further ado, meet Elaine Luther! Elaine is a local (Forest Park) artist, jeweler, blogger and busy mom. She is currently exhibiting for Women's History month at the Chicago Public Library's West Englewood branch.
The exhibit, titled Our Ladies of Perpetual Housework, is a collection of assemblage sculptures honoring the neverending work of, well, all of us trying to keep a home (and a life) ticking over every day. The collection is on show through March 31, 2014. Read more about the exhibit here. Then take a look at the prints on sale at Redbubble.
 |
| photo credit: David Pierini |
Elaine works a lot with metal, not just in her jewelry making but also her art. So it's fitting that this tutorial involves silver. Silver leaf, to be exact. This is a great technique for giving new life to old wood pieces. In this case, picture frames. Enjoy!
Elaine: This easy project doesn’t take much in the way of supplies. Silver leaf, metal leaf sizing and sealer are easy to find at the crafts store. One package of 25 sheets of real silver leaf cost ten dollars and I have lots of sheets left over. I fell in love with the laser cut wood frames at the craft store, so I'm demonstrating with one of those. But any frame will work - update something old or support your favorite thrift store.
Silver Leafing Materials List:
1 picture frame
1 package of Silver Leaf
1 jar Metal Leaf Size (glue)
1 jar Metal Leaf Sealer
2 inexpensive synthetic paint brushes
1. Make sure you work on a plastic surface. Shake the metal leaf size well before using.
2. Apply the metal clay size (that’s the glue) to the top, sides and any recessed areas of your frame. Once the whole thing is done, allow to dry. The directions on the jar say allow to dry for 60 minutes - I find 20 minutes to be enough. This may vary by climate. Because I was working on unsealed wood, the size soaked right in. I went around twice to get a good application of size.
3. Making sure your hands are free of any size (glue), gently lift out a sheet of silver leaf.
4. Apply sheets of silver leaf to the frame until the whole frame is covered.
5. Keep applying silver leaf, using a clean, dry brush to brush down the leaf. Using your fingers puts fingerprints in the leaf, so it’s important to use the brush. Gently tear off the excess pieces of leaf and reposition.
6. Continue brushing down the silver leaf, taking care to keep the brush away from any exposed size. You want to keep this brush dry.
7. My frame has hollow bits, so I poked through those with the brush and then brushed the leaf into those recessed areas.
8. For the next part, you’ll need a dust mask. Tiny bits of silver leaf fly around and you must not breathe that in.
9. It’s an expected part of the process that there will be little bits that are not glued down. You just rub those away, gently with your fingers. All the silver leaf that’s in contact with the size will stay put.
10. Continue buffing down all those edges.
11/12. Once the excess was rubbed away, I could see the areas that didn't have silver leaf on them. I decided to go for a 2nd round. If you need to do this too, apply size on all the parts where bare wood (or paint) shows through.
13. I found I had missed a lot of those recessed areas and was wishing I’d chosen a simpler frame! Get that paint brush into all those little areas.
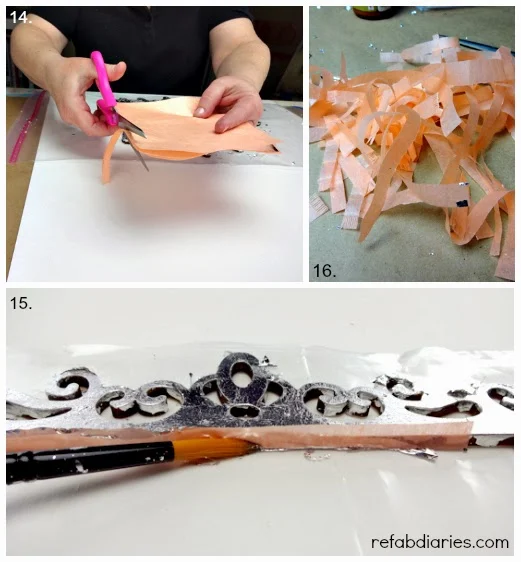
14. Because I was focusing on the tiny areas that were missed, I cut my silver leaf into strips for more accurate placement and coverage. Because silver leaf is so thin and fly-away, you need to cut it between two pieces of the tissue paper that it comes in.
15. Here I’m applying one of those strips to a thin area. Rub and buff again, as you did before. I ultimately did a third round on this piece (not shown).
16. A pile of leftover tissue paper from all those strips!
17. Last step! The metal leaf sealer does not need shaking before using. It goes on a milky color but dries clear.
18. Apply the sealer smoothly, do not allow it to puddle. I also sealed the back, as it was sticky from size dripping through to the other side.
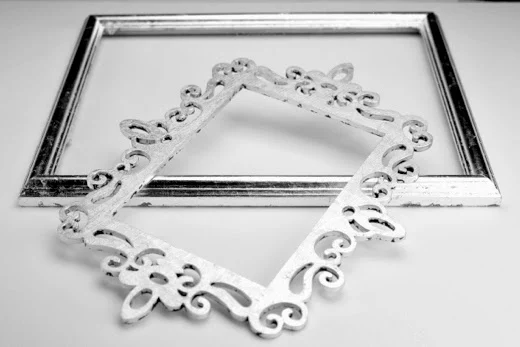
And there they are. A craft-store and a thrift-store frame with a new lease on life. Read on to see what I did with the laser cut frame!
Our TV remote used to get lost so often that I thought I should velcro it to the wall! I finally did it, but with some real style ... placing it in a silver leafed frame! If you're interested in doing this, here's what you need:
1 package of Command Strips for hanging picture frames
1 package of sticky back Velcro
I used special special two part command strips for hanging pictures. Command strips won’t damage the paint, which is why I chose them. That, and I wanted the frame to lay very flat on the wall.
I cut them in half the long way to make them fit on my narrow frame. Apply the command strips to the back of the frame. The last bit of backing isn't removed until you're ready to stick it to the wall.
I attached the soft side of the Velcro to the remote so it's comfortable to hold. To make sure the other half of the Velcro ended up in the right place on the wall, I attached it to its mate on the back of the remote. And ta da! One gorgeous silver-leafed frame, installed next to the couch, and holding the never-to-be-lost-again-remote control!
Thank you Elaine! Be sure to check out Our Ladies of Perpetual Housework exhibiting at the Chicago Public Library's West Englewood branch. Photo credits to Elaine's husband Ralph Romero.
-----------------------------------------------

.jpg)


Add your comment